Oh Pinterest how I love you...I haven't been on there a lot lately but once I get back on its like riding a bike (so many projects I now "MUST" try).
While pinning my brains out I did create a fun board with several pumpkin themed crafts that I thought would be fun to try and a few food related ones.
Follow With Envy Studios's board Pumpkin Themed Crafts on Pinterest.

Sunday, September 27, 2015
Tuesday, September 22, 2015
DIY: Patterned Pumpkin Banner
If you know me in real life you know I always have big intentions when it comes to craft projects. But usually my intentions are bigger than my available time, ability or attention span. But I'm trying to turn over a new leaf where I am still crafty but in a more realistic way :)

I made this patterned pumpkin banner to add a little fall decor to the house. I got the idea from one of my daughter's old school color projects of a pumpkin made from 3 circles. Its easy, takes
minimal supplies, doesn't take too long and is pretty versatile. I made
this banner with Fall in mind but you can switch up the papers and do
a Halloween theme.
Materials:
+Scrapbook Paper
-You can use scrapbook paper from your local craft store or digital scrapbook paper you print on your printer (I am using a few sheets from my Fall Leaves & Trees digital scrapbook paper set*)
+Oval template
-I used a thick oval coaster we had lying around the house. Just remember size of the oval will impact the size of the whole pumpkin. My template is approx 4.5"x3.5”.
+Ribbon
-you can use yarn or string as
well
+Scissors
+Glue
+Pencil (not pictured)

How To:
Before you begin you might want to figure out how many patterns you want for each pumpkin and how you want to arrange your pumpkin. This will help you make sure you cut enough ovals of each pattern
Step 1:
Use you oval template and trace the
ovals onto scrapbook paper. Cut out the oval scrapbook pieces.

Step 2:
For each pumpkin take what will be the two ends/sides of the pumpkin and glue them
together. It works best to over lap your two sides some. Let dry.

Step 3:
For each pumpkin glue the oval that will be the middle of your pumpkin, down in the middle of the two end pieces. Let dry.

Step 4:
Make the stems. I chose to freehand a
stem for each pumpkin but you can cut out a simple rectangle stem to
fit your pumpkin. Cut out the stem and glue it to the pumpkin (I glued the pumpkin on top of the stem). Let dry.

Step 5:
When the pumpkins have dried, punch a
hole in the top of the stems.** Thread ribbon through the holes for
each pumpkin. Make sure to leave enough ribbon on the ends for hangng.

Step 6:
Hang banner in desired area and you are DONE!!

I hope you find this easy and fun!!
*If you are wanting to use digital scrapbook paper you can easily just print out a a sheet on your printer. I took a 12x12 JPEG page and just printed it out 8.5"x11" paper (most printers will adjust for the size of paper you are using). My printer prints to the edge so there isn't a white border but even if yours doesn't its fine since you will be cutting the paper up anyway.
**Depending on how big your
banner is you may want to punch one hole on each side of the stem (or
one hole on each side of the top of the pumpkin). This will help
prevent the pumpkins from turning sideways while hanging. My banner was small and in
a small space so the pumpkins didn't turn on me.
*******************************
Other Ways to Use the pumpkins:
+You can nix the hole punch and attach
the pumpkin to a wooden dowel and stick in a fall flower centerpiece
+You can nix the hole punch and glue
the whole punch on a sheet of cardstock (patterned or solid) and
stick in a frame for quick fall décor
+You can hang the individual pumpkins
from ribbon in windows or from branches in floral arrangements.
Monday, September 21, 2015
Theme Week Begins!
I'm dusting off the old blog today to bring you the start of "Theme" weeks! I will be picking a theme each week and showcasing craft tutorials, products and freebies. I'm super excited about what I have in store for you guys. I am hoping it will appeal to everyone whether you are a small business owner who uses my clipart or paper in your products or a parent that uses my party products and iron ons!.
So for my first theme week I have chosen...
Fall & Halloween are right around the corner. Pumpkin flavored items are in full force so it just seemed fitting to start here (and I may be craving some pumpkin spice something right now!).
I hope you check back with me throughout the week to see what I have in store for you.
But its Monday and no one really likes Mondays so to bring a little cheer I have a Halloween pumpkin FREEBIE for you!! ENJOY!!!

ZIP file with 6 individual labels in PNG format DOWNLOAD HERE
PDF file with 6 labels on a page DOWNLOAD HERE
Monday, June 23, 2014
Whats New: 6/16-6/22


Friday, June 20, 2014
Photo Fridays: Carousel Princess Party

One of the best things about what I do is getting to see how my customers use the products they purchase from me. Its the highlight of my day when I get customer photos.
One of my customer's, Colleen, was nice enough to share some picture's from her two daughters' beautiful joint birthday party. I added a carousel horse to my Princess party collection for a fun, unique party! Enjoy these great photos!!


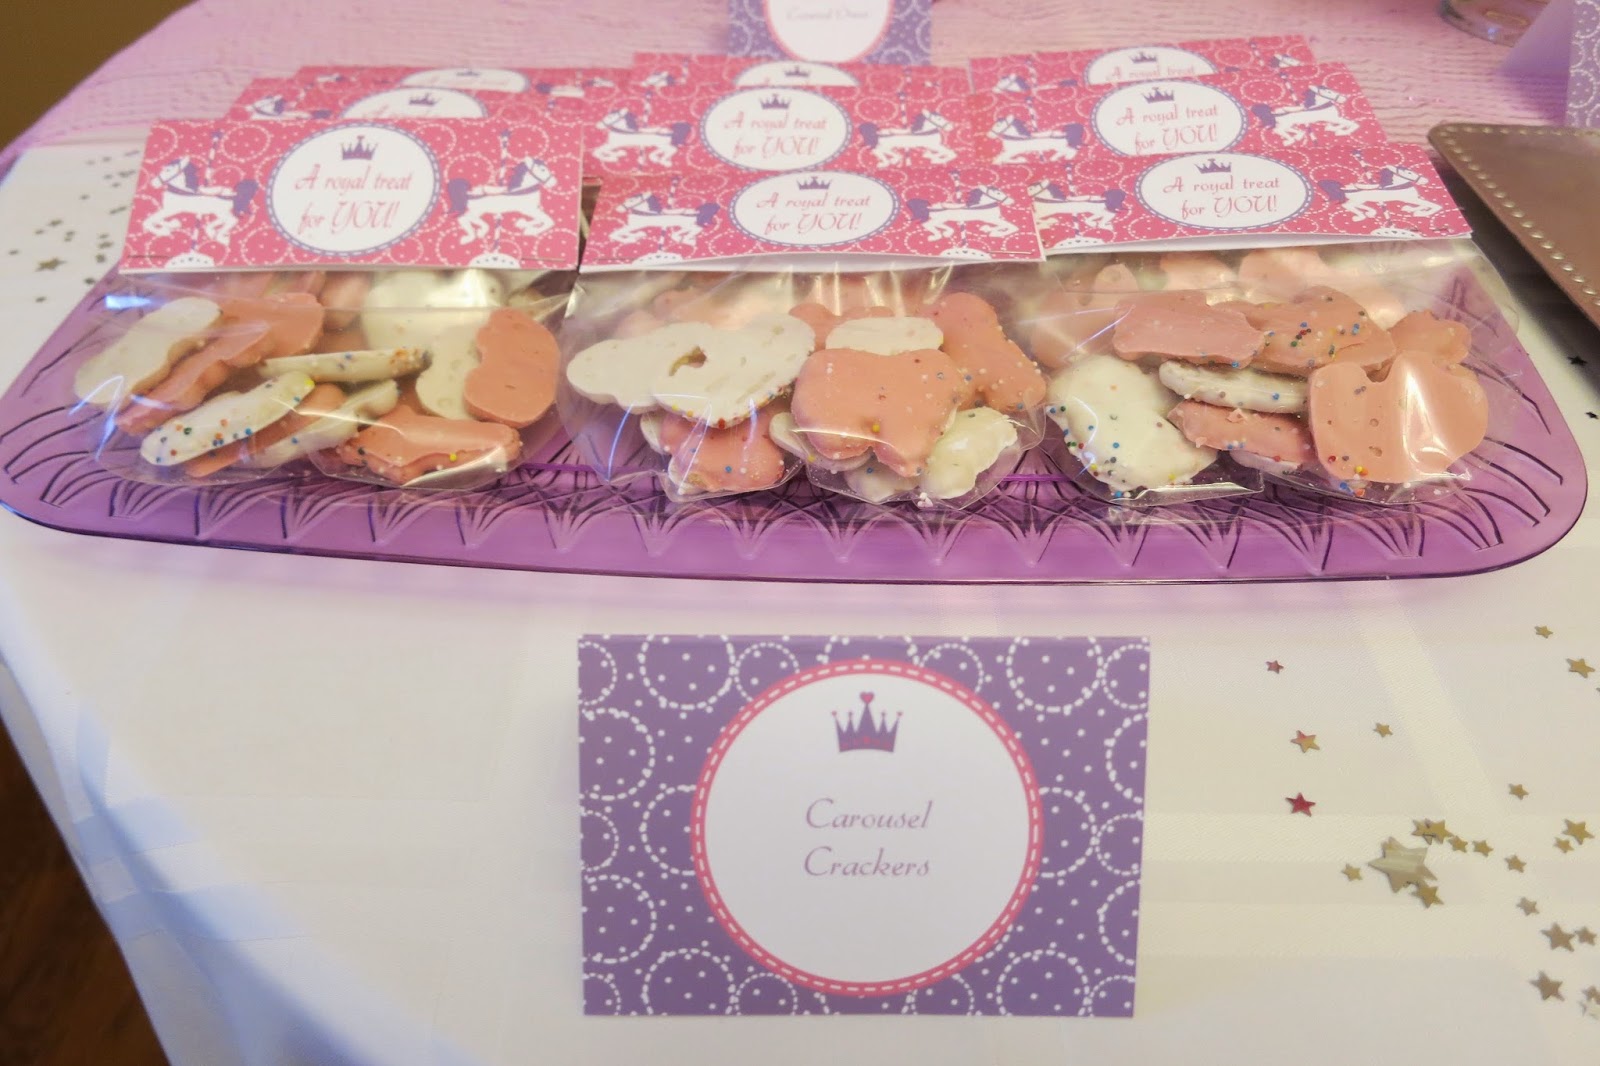


Have a Royally Sweet Friday!!!
Monday, June 2, 2014
A Time To Celebrate!
It's June!!! A year ago today With Envy Studios took over as my full time job! Its been a stressful, crazy, and amazing year. Plus my birthday is at the end of this month and I just closed out May which was With Envy Studios' best month so far. So really LOTS of reasons to celebrate!
PS. A year wrap up will be up on the blog later this week :)

Tuesday, May 20, 2014
Etsy Digital Designers Summer Facebook Hop!!
The Etsy Digital Designers Team
Facebook Hop is in full swing!! Make sure to grab your 32 amazing
freebies! The hop runs until May 31st! Below is my contribution.

START HOPPING HERE!!
Subscribe to:
Posts (Atom)